MuhRec Tomographic Image Reconstruction
The following summarises a tutorial Anders Kaestner (PSI) gave in October 2017 in Varenna. We are grateful that he has made his tomography tools freely available, and also grateful to others at PSI and Burkhard Schillinger at FRM-2 Munich for providing the excellent neutron tomographic data sets. We have used the FRM-2 clock data here: this is an idealised dataset taken under optimal conditions and pre-treated in imageJ, so it is not typical of raw data, but it produces iconic results for illustrative purposes. The left-hand image is a neutron projection, and the right-hand image a slice from the reconstructed clock. We used a mid-range Intel i3 computer with 8GB RAM and reconstructed only the central clock mechanism, with 750 slices taking ~1 hour of computing time. With less RAM fewer slices can be reconstructed unless the disk is used for intermediate results. But even with an Atom powered Windows tablet and only 2GB RAM, it was possible to reconstruct 150 slices, again in ~1 hour. With x2 binning, the whole clock could be constructed in 2GB. (Click to enlarge)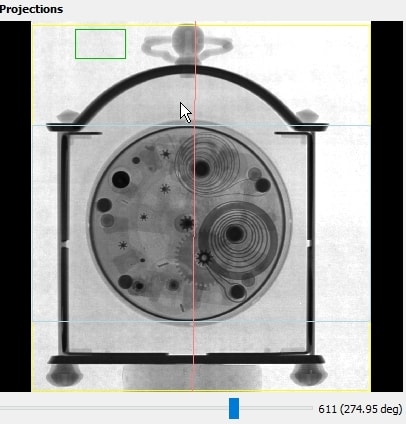
Installation of MuhRec
MuhRec can be downloaded as a compressed .zip file for either Windows 64-bit, MacIntosh or Ubunto Linux. Scroll down to "Assets" at the end of the description of each release to find the .zip file. Double-click the .zip files under Windows and drag the Muhrec folder to any convenient disk location, then double-click the .exe file to run MuhRec. If there are error messages, download and install the following Windows run-time packages and try again.- Microsoft Visual C++ 2015 Redistributable
- Microsoft Visual C++ 2013 Redistributable
- Microsoft Visual C++ 2012 Redistributable
See also: Ch. Carminati & A. Kaestner (2017) 3rd Int. Conf. Tomography, Lund, Sweden
Download seperately the MuhRec manual.
MuhRec will open dialogues that allow you to configure your projection data and processing, launch the reconstruction of slices from a series of projections, and save and display them.
You can download a small 60 MB sample of Burkhard Schillinger's ANTARES clock data for testing. It has been cropped to the clock mechanism, binned x2x2x2 and limited to 180-degrees, but still gives an excellent reconstruction with both MuhRec and Octopus.
This example uses Muhrec3, and the interface will be slightly different for other versions. The action menu "File, Reconstruct, Geometry, Options. Help" is followed by 4/5 buttons which open dialogues to input projection data information, configure projection geometry, set the processing configuration, and display results. The button names may change with Muhrec version, but the dialogue for each button remains similar, as follows.
IMPORTANT: When you re-install or move MuhRec, do File/New to start a new project. If MuhRec refuses to start after a crash, delete the CurrentRecon.xml in your path C:\Users\UserName\.imagingtools\ and re-enter all data.
![]()
Configuration of the Projections Dialogue
The first Browse button is used to select the first of a series of TIFF or FITS projections; all 801 images with the same root name will then be loaded ! The second Browse button selects the first of a series of Open Beam (no sample) images, and the third Browse button, the first of a series of Dark (no beam) images; only 4 or 5 are needed. The Skip list allows you to skip bad images that were repeated - we will not use it for now. Click the Preview button, especially if you change the Binning, and rotate the projections to find a small background area always outside the clock. (Click to enlarge)
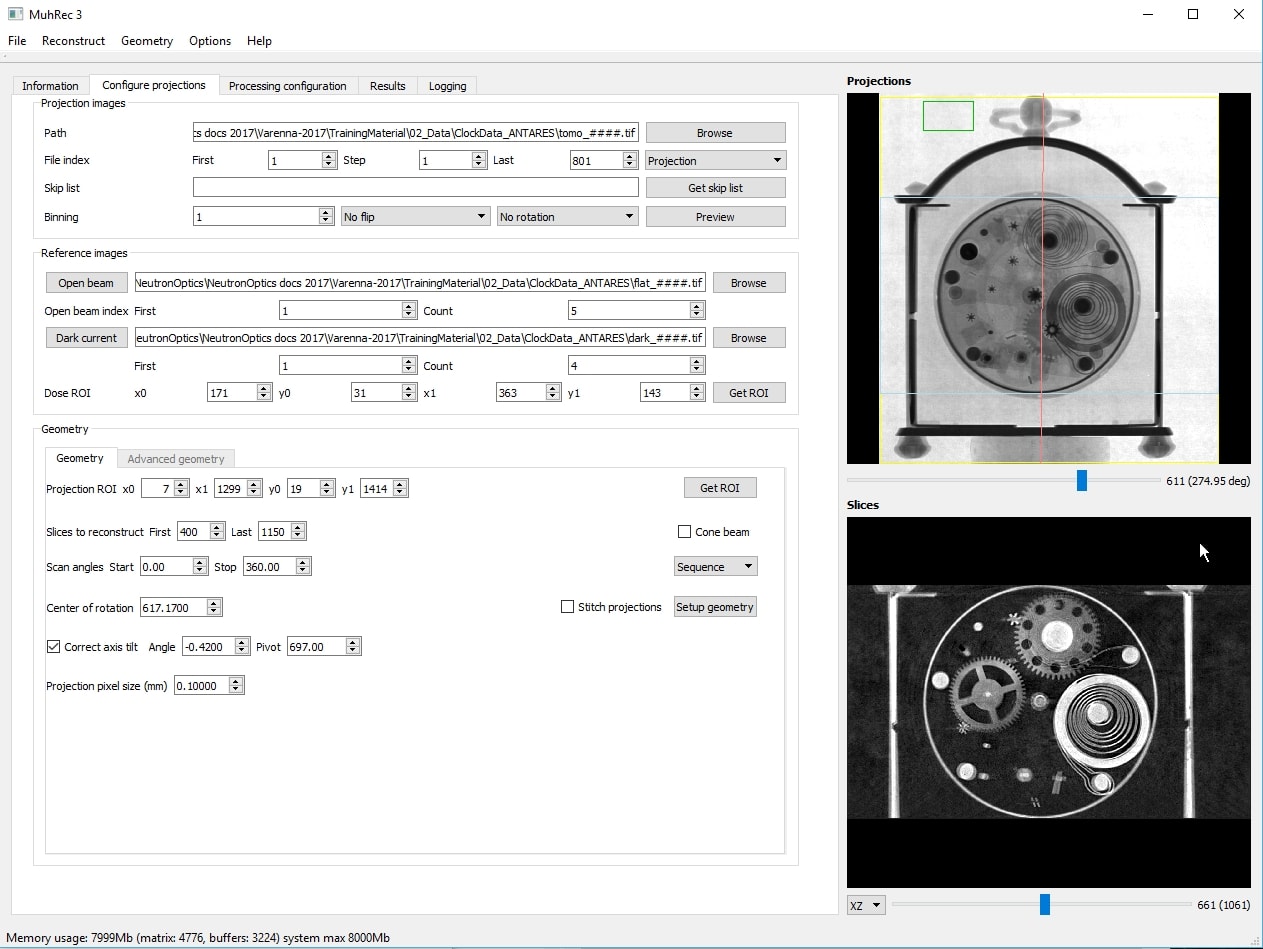
The first Get ROI is used to enter the Region-Of-Interest of the background; use the mouse to select this small green box and then click the Get ROI button. Use the mouse again to select the full region of interest and then click Get ROI under Geometry to display the large yellow box. Now, enter the first and last Slices to Reconstruct; these numbers should be within the y0 and y1 limits of the Projection ROI. A blue box will outline these slices. Check the Scan angle range; it is usually 0-180 or 0-360 degrees.
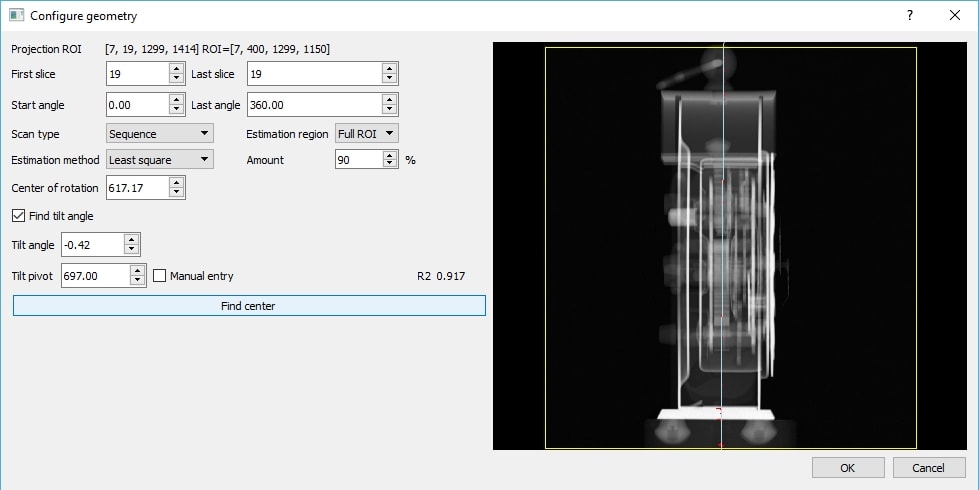
Reconstruction Geometry Dialogue
Finally click the Setup Geometry button or go to the second dialogue to determine the Center of Rotation and the Correction for Axis Tilt. Check the Find Tilt Angle box and click the Find Center button which will draw a red line showing the calculated center and tilt. (Click to enlarge)
Important: After you enter data, do Ctrl+S to save it for future work.
![]()
Processing Configuration Dialogue
You may need to add a number of essential Preprocessing Modules if they are not already listed. Click the first Add button, select FullLogNorm from the Module list and click OK. You also need image cleaning filters and the ProjectionFilterSimple. (Click to enlarge)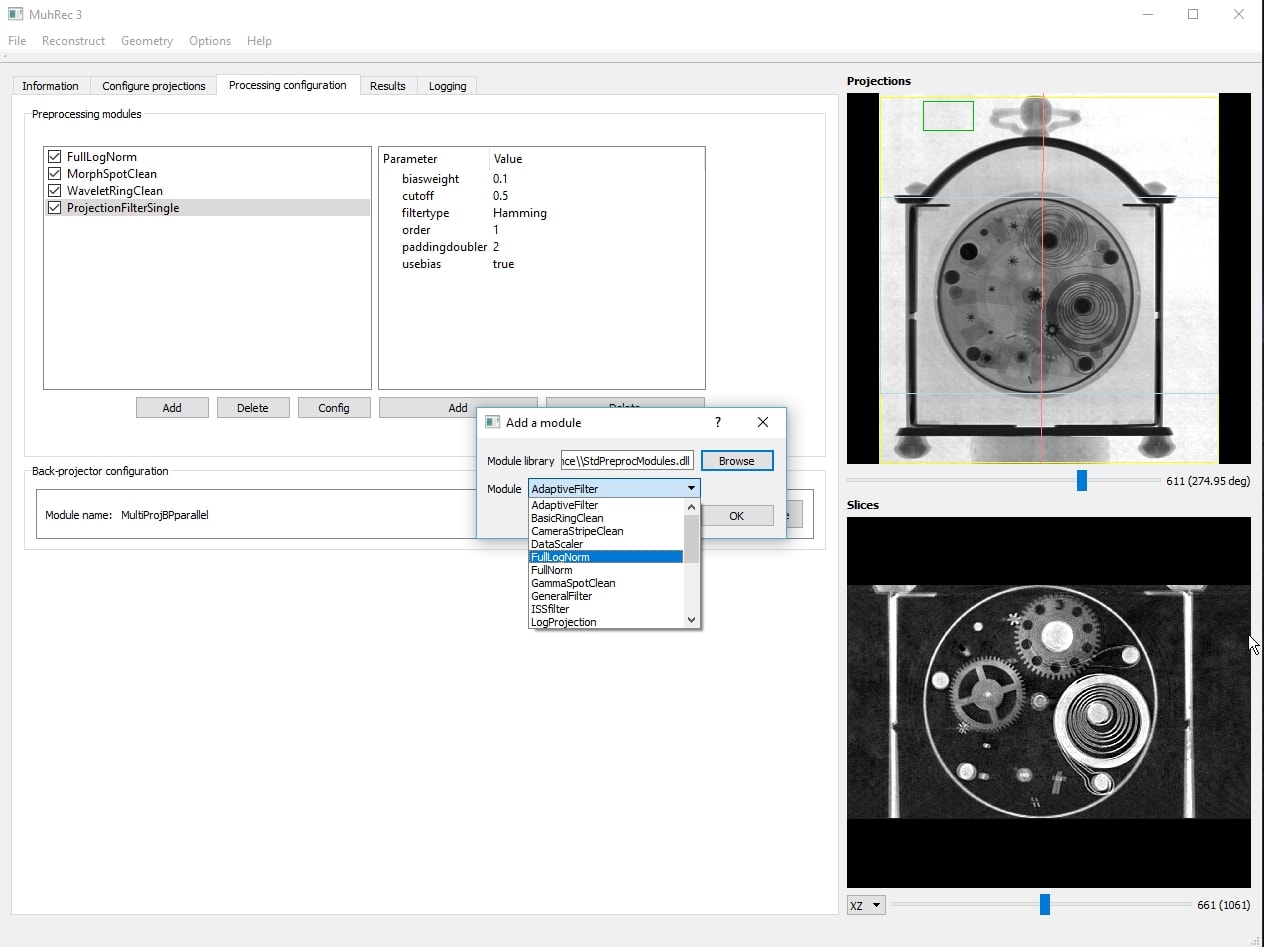
Reconstruction of the Slices from the Projections
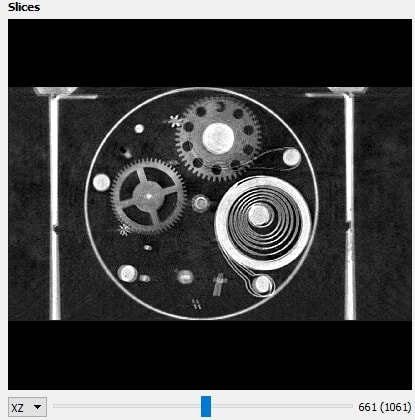
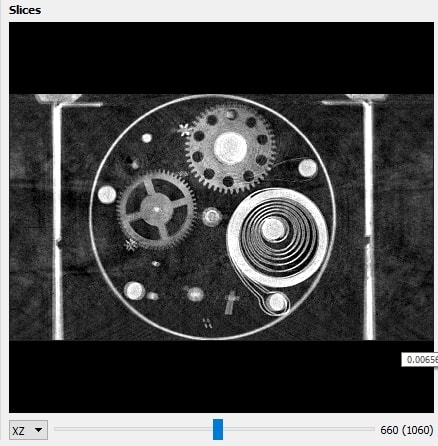
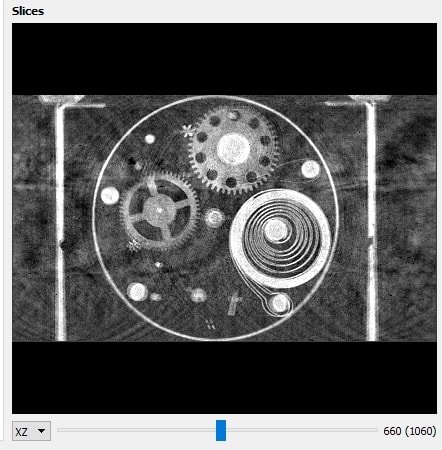
You are now ready to launch your first Tomographic Reconstruction ! Just hit Ctrl+R or select Reconstruct from the main menu. If you have chosen too many slices for the available memory of your computer, go back and select fewer; otherwise MuhRec will use your disk for intermediate results and it will take longer. When calculations are finished (they can take an hour or more depending on the number of slices) the histogram in the Results tab will show the distribution of intensities in the reconstructed images and allow you to adjust the grey levels (choose Auto Levels). Select the XZ view of the slices and drag the blue cursors to scan through them, or through the angular projections. Save matrix saves all slices as separate TIFF files.
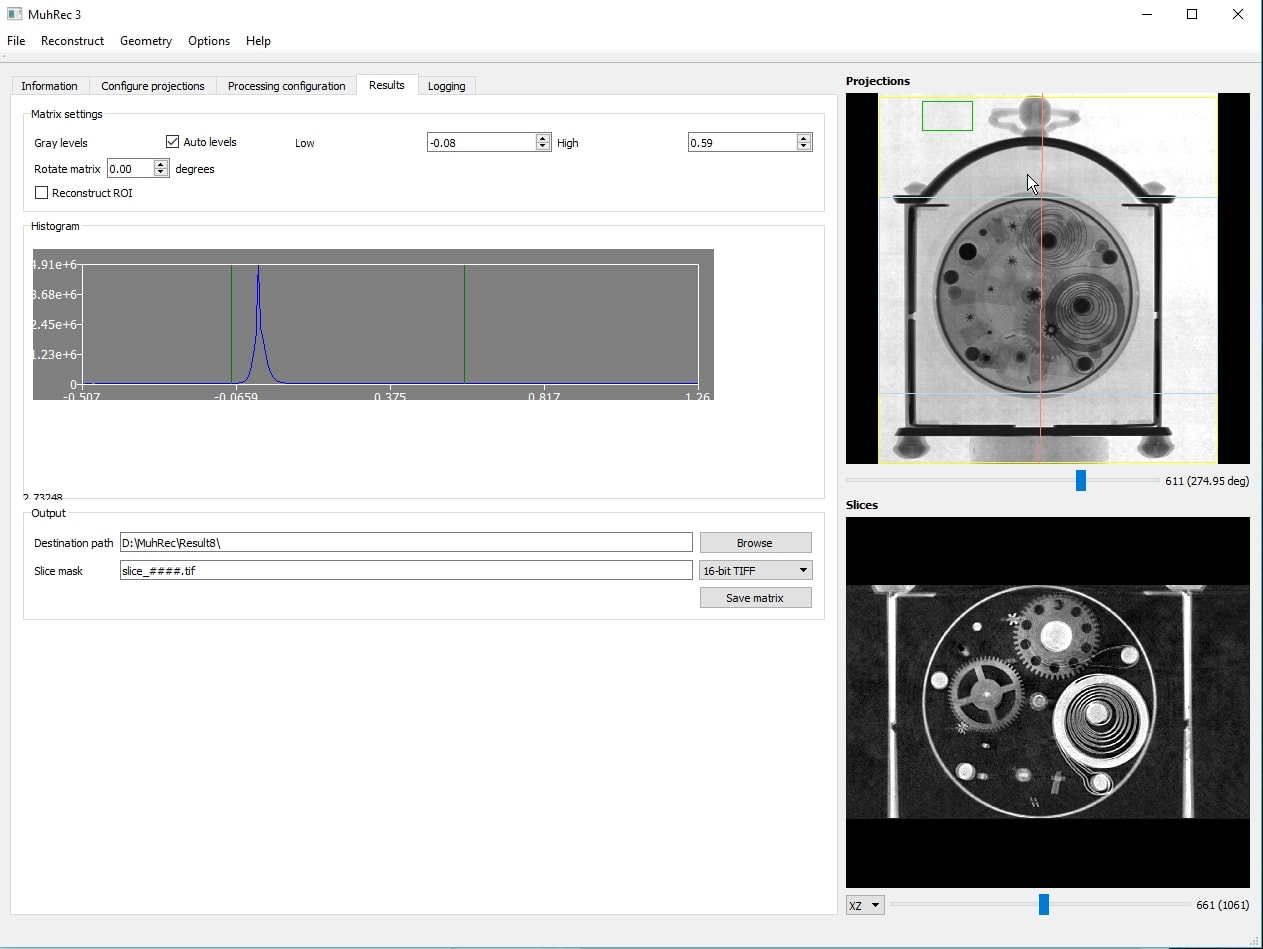
The center of rotation is the most important parameter, and automatic centering is only a starting point. Near the bottom of these reconstructed XZ-slices you can see small sharp features that are doubled, due to small errors in the center or tilt angle. Limit the reconstruction to these regions and adjust very slightly the center to eliminate this doubling. Then check that you have not introduced doubling at the top of the slice !
Of the other tabs, Information simply allows you to enter information about your experiment, and Logging lists information about the progress of the calculation and eventual errors. This should get you started, but of course there are many more options that you may implement, and for that you should read the manual.
Remember, your own data will not look as good as this idealised clock data.
If you have comments or suggestions, please use the MuhRec GitHub site.
![]()
Experimentation - Number of Projections & Binning
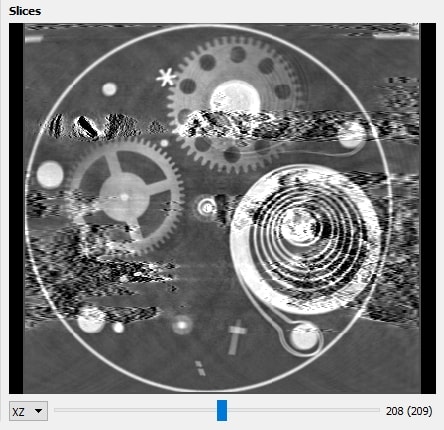
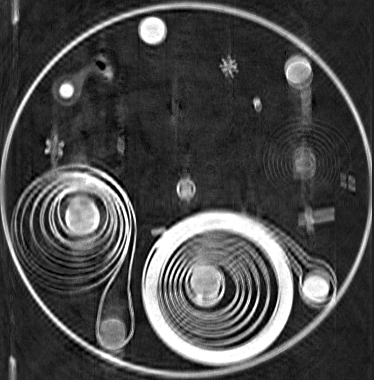
People often ask how many different projections are needed ? This Clock dataset contains 800 projections, which might seem a lot. To answer this question we reconstructed the same 750 slices using the full 800 projections, 400 projections (step x2), 200 projections, and 100 projections. The results speak for themselves. With only 100 projections you still see sharp details in the reconstruction, but they are overlaid with strong artefacts. Only with 400 projections do we obtain a relatively clean reconstruction and 800 is best.

Binning the camera pixels is a more effective way to speed up reconstruction and reduce computer memory requirements. A x2 binning reduces the computer time and memory by x4 to 15 minutes with <2GB RAM, and with x4 binning the reconstruction is finished in only 3.5 minutes ! When Binning is changed, be sure to hit Preview before selecting the background ROI and full ROI, the Slices to Reconstruct, the Center and Tilt Angle. Depending on the resolution of your camera, x2 binning below left may be acceptable but x4 binning below right may not. (Click to enlarge)


Since x2 binning with half as many projections still gives a fair reconstruction, we can construct a reduced data set with a x2x2x2 binned section of the full clock data mechanism. After constructing an imageJ stack with the full data using Image/Stacks/Images_to_Stack, we select just the region around the mechanism and delete the rest with Shift+x. We bin this cropped stack using Image/Transform/Bin and then save the individual images again with File/Save_As/Image_Sequence after first extracting the binned dark and open beam images. This is also a convenient way of renaming all images in a sequence. The resulting dataset of 401 projections is only 118MB instead of the original 2.78GB, and can be reconstructed with fair quality in just 3.5 minutes (below left). (Click to enlarge)
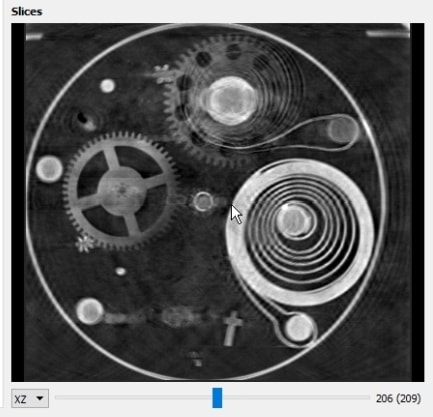
Centering is Important. It is of course better to carefully align the neutron instrument and sample rather than correct the data for errors, and the ANTARES instrument is well aligned. So we can initially assume that the center is the middle of the 401 projections covering 360 degreees, i.e. center=200.5 and neglect possible tilt errors. Indeed this gives a fair XZ reconstruction (above left). If we shift slightly to center=198.0 we see a slight doubling in the reconstruction (above right). MuhRec was actually unable to center it automatically.
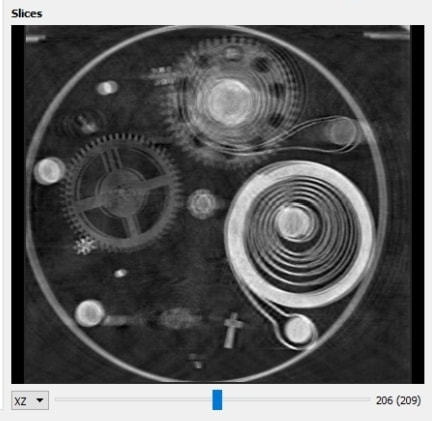
16-bit or 8-bit images ? It is clear that 16-bit images allow a much larger intensity range (65,536 greylevels) than 8-bit (256 greylevels) and should always be collected. But since the size of the dataset is much reduced with 8-bit images, it is interesting to try an 8-bit reconstruction. The 16-bit TIFF stack was converted and exported to a series of 401 8-bit images which occupies only 60MB. The reconstruction then took only 22 seconds, but there was strong interference in the reconstruction (left image below). (Click to enlarge)

Closer examination shows that interference is due to
streak artifacts from opaque regions in the projections. So we tried adding a constant background of 25 to the whole stack of projections using Process/Math/Add. This removes the interference and results in a very clean reconstruction (right image above).
![]()
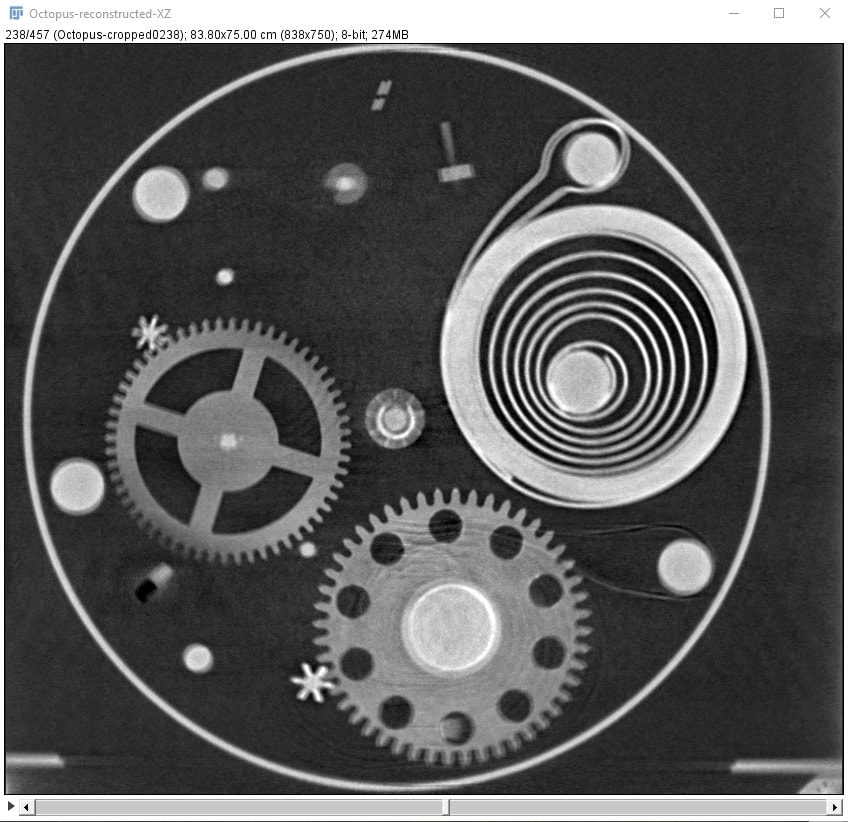
MuhRec can be compared to Octopus Reconstruction, a commercial application. Fill in their WWW request form to obtain a 30 day evaluation, with Octopus Visualisation (free) and Octopus Analysis. First impressions are that both give excellent reconstructions for parallel beam neutron data, and take about the same time for small data sets. Octopus writes sinograms to disk and uses less memory (and CPU), has more options, especially for non-parallel beam X-ray data, and perhaps estimates the rotation axis more precisely.
The 2.8GB non-cropped full resolution ANTARES clock data could be reconstructed in Octopus with <2GB RAM (but RAM is less expensive than Octopus :-) Finally it is difficult to see much difference in the full resolution XZ reconstructions of Octopus (below left) and MuhRec (below right). In both, small errors remain in the rotation center and tilt.

3D Visualisation of the Reconstruction with ImageJ
ImageJ or Fiji is recommended for image analysis, and a complete ImageJ installation is included on the NeutronOptics software CD under "Extras". Copy the ImageJ folder to your C: disk & launch ImageJ to set defaults and update ImageJ. To load a series of TIFF slices into a stack, use File/Import/Image_Sequence and select the first image; all images with the same root file name will be loaded. You may need to increase the memory available to ImageJ, and if you have a 64-bit computer, use 64-bit Java.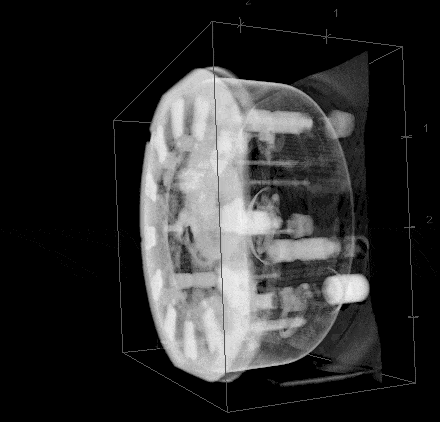 You can scan through the images in this TIFF stack by dragging the cursor, or open it with Plugins/3D/3D_Viewer in the default Edit/Display/Volume view. Do Ctrl+T and set the transparency to 85%, then View/Record to obtain this 3D movie extract.
ImageJ contains many simpler tools for examining stacks of images. Suppose we have a stack of XY slices and want to examine a selection of XZ slices of a particular region, such as the clock mechanism. We will select just a few slices of the x2 binned data to reduce the file size for the WWW.
-
File/Import/Image_Sequence
To read the XY slices into a stack
Image/Stacks/Reslice/Flip
To create XZ slices from XY stack
Image/Stacks/Tools/MakeSubstack
To select a range of slices
Select the round clock mechanism
Then hit Shift-x to crop this stack
File/Save_As/Gif
To save the stack as this GIF
Download this image, open it in imageJ and drag the cursor to scan through the 10 slices. In practice you would save the full 16-bit TIFF version to retain the full range of intensities, but we have used GIF for WWW display. Look up the imageJ user guide for more information about Image/stacks and other menu items. Octopus Visualisation can be used instead of imageJ, but again there does not seem much advantage in one over the other.
We have examined the clock mechanism, now look at the fine artwork !
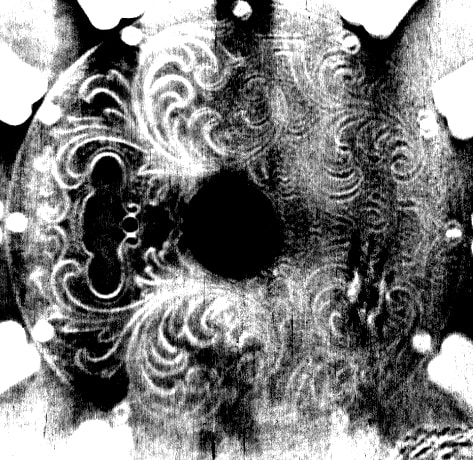 Fine Engraving revealed
Select XZ slice showing
the face of the clock
Image/Adjust/Brightness
To emphasise the details
Image/Zoom/In
To magnify these details
Select the area of interest
Then hit Shift-x to crop to that
![]()
You can Print these pages from your browser at 125% scale.