NEW ! Try the fitsCap imageJ camera macro tool
fitsCap works for all NeutronOptics blue ToupTek and red ZWO detectors (and others), setting capture options, and opening and displaying images directly in imageJ.- Control and plot temperature, with unlimited binning in "sum" or "average" mode
- Execute a command script after each image e.g. to change sample orientation
- Automatically sum or average a series of images; stop when intensity is sufficient
- Automatically subtract calculated diffuse background, or a background file
But click on the links below for instructions for particular NeutronOptics cameras.
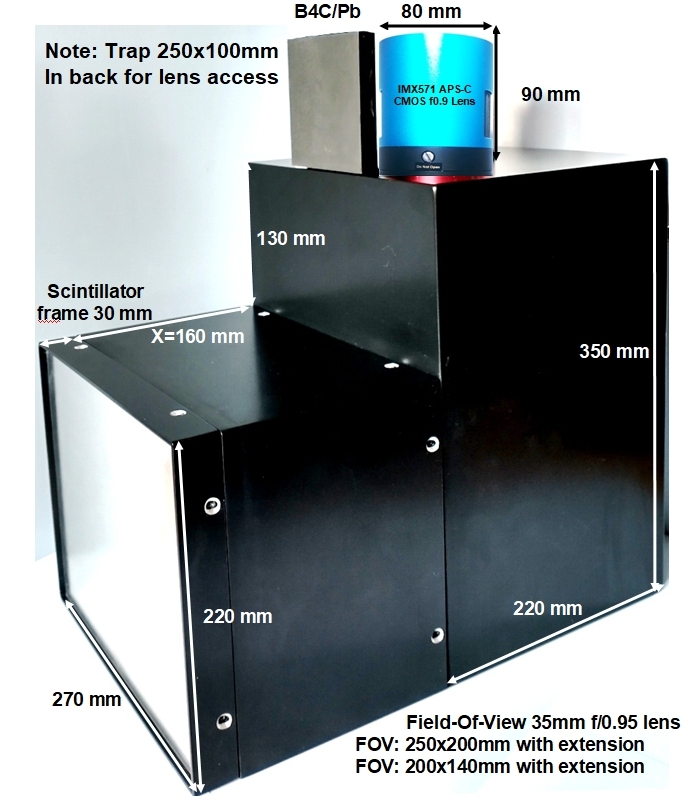
The Large Imaging Camera is for Tomography
These 250x200mm cameras use large CCD or CMOS detectors coupled with bright lenses. Larger or smaller cameras, with FOV from 125x100mm to 500x400mm can be custom made.
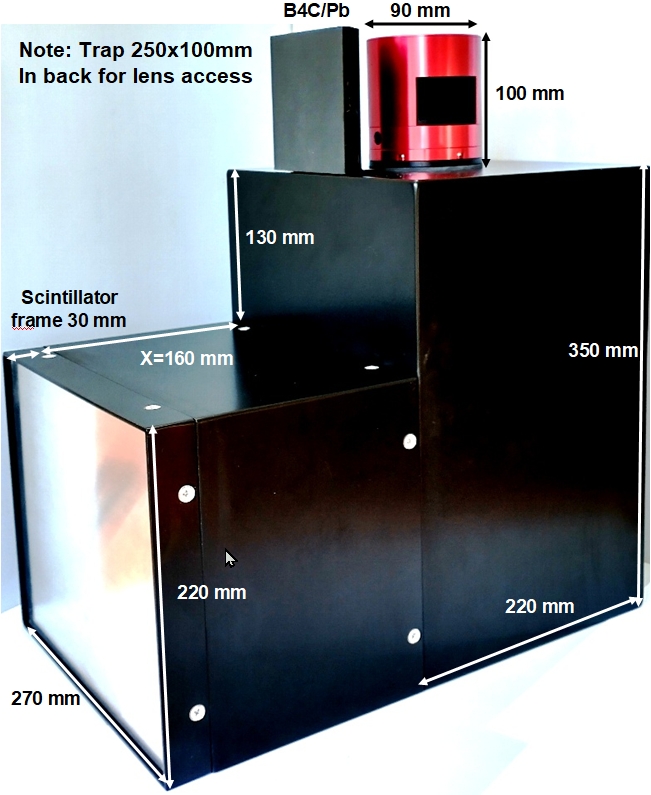
Slightly different manuals are available for our large imaging cameras:
Large CMOS Imaging Camera
APS-C CMOS Imaging Cameras
Large CCD Imaging camera
Old imaging camera
To reconstruct 3D tomographic images you can use the free MuhRec Tomography.
![]()
The fast FLIR, BASLER and ZWO CMOS Cameras
 All our small x-ray or neutron cameras can be supplied with an optional FLIR (Point Grey), BASLER or ZWO CMOS camera when high frame rates are required (up to 41 fps). Dark current noise is higher for CMOS cameras, limiting them to shorter exposures of up to minutes, but
cooled versions with the 3000x3000 pixel IMX533 can also be provided.
All our small x-ray or neutron cameras can be supplied with an optional FLIR (Point Grey), BASLER or ZWO CMOS camera when high frame rates are required (up to 41 fps). Dark current noise is higher for CMOS cameras, limiting them to shorter exposures of up to minutes, but
cooled versions with the 3000x3000 pixel IMX533 can also be provided.
The IMX174 is currently the best small Sony CMOS detector for low-light imaging. It is a relatively large sensor, with big pixels favouring light capture, with high Quantum Efficiency. The ZWO camera is powered by a USB cable, and the FLIR GigE version by a powered GigE cable.
To control this camera and display the image on a PC, you need
FLIR,
BASLER or
ZWO or
software (included).
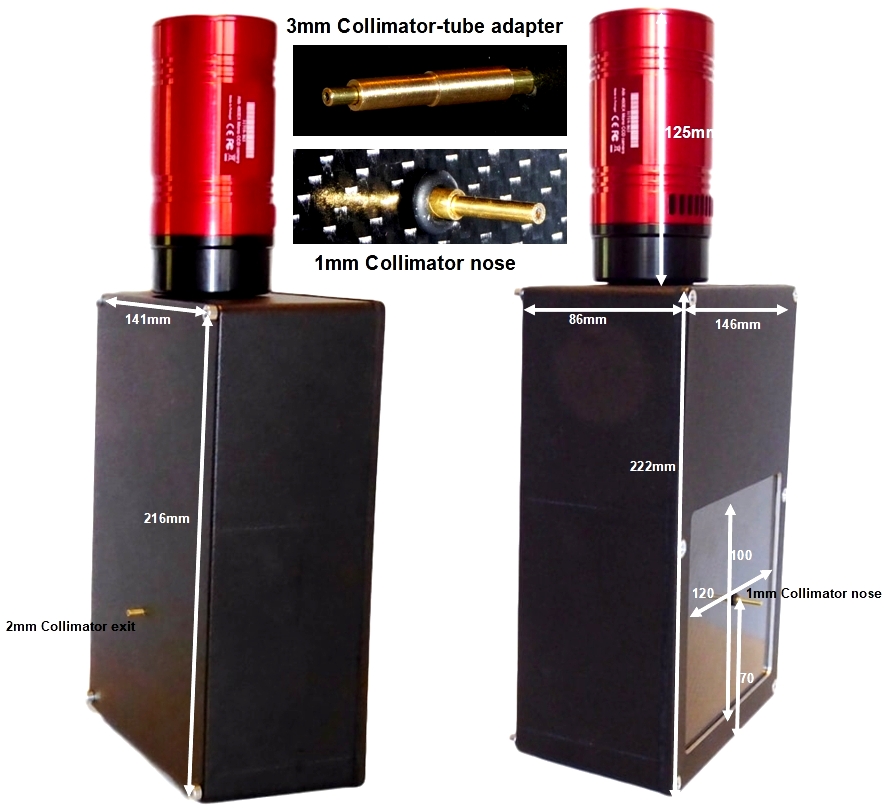
The APS-C CMOS Compact and Laue cameras
The NeutronOptics 1-CMOS Laue Camera has x6 the efficiency of our old 1-CCD camera in the same box. It uses a x3 larger Sony APS-C IMXX571 detector, & a x2 brighter f/0.95 lens.A larger 180x120mm version replaces our old 2-CCD camera, again with higher efficiency.
To control these cameras, you need special software. Also read about OrientExpress

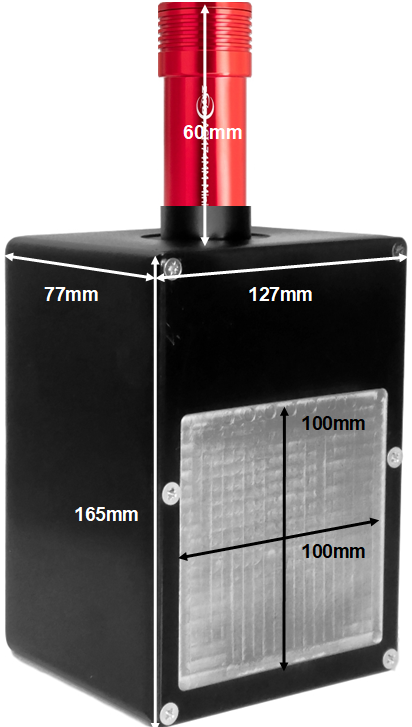
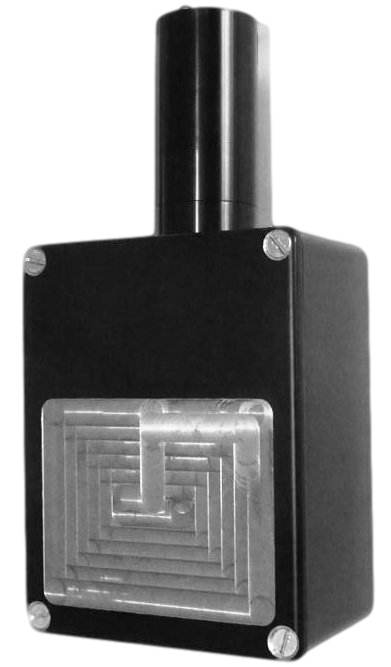
High Resolution Macro Imaging Cameras
 Our standard macro camera provides 1:1 macro imaging, where the object is the same size as the CCD. The resolution of small objects is limited only by the resolution of the the latest Gd2O2S:Tb high resolution neutron/x-ray scintillators now available from RC-TriTec. It is supplied with standard x-ray and neutron scintillators that can be interchanged easily.
Any C- or F-mount detector can be used, or even an ordinary Nikon or Canon SLR camera with the appropriate adapter. A 50µ grid can be imaged with 3.9µ CCD pixels to an optical resolution of <10µ (detail), though the real resolution will depend on the scintillator and collimation.
The FOV can of course be doubled with a simple 100mm extension, which gives a FOV=25x20mm with the 1" Sony ICX694ALG CCD, with a resolution of ~9µ on the 50µ grid.
To control this camera with one of our high resolution CCDs, you need special software (included).
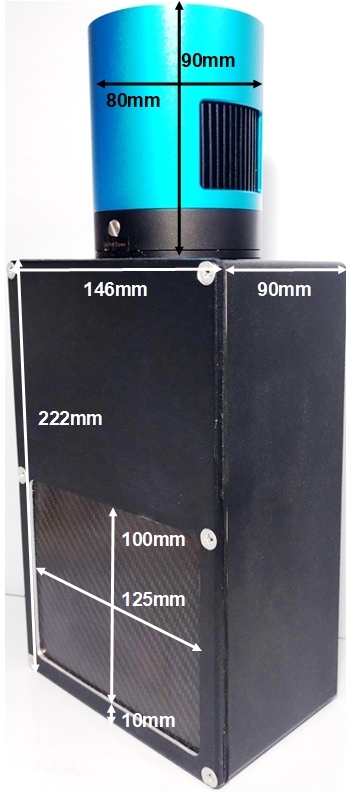
High Resolution Tandem Macro Cameras
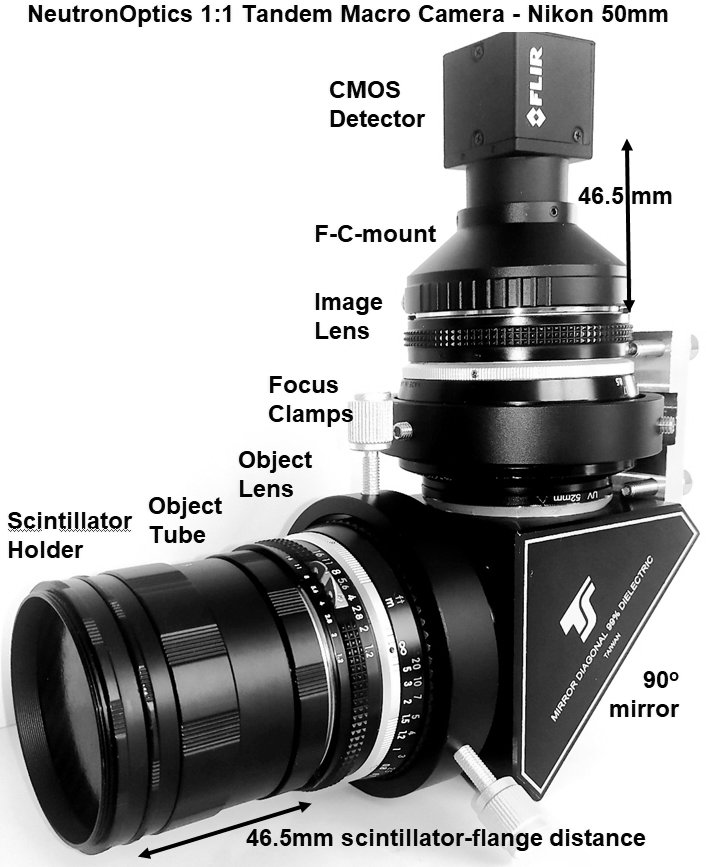 Our Tandem Macro camera also provides 1:1 macro imaging, and the intensity is up to x8 greater, but over a maximum FOV of only 10mm. The resolution is again limited by the resolution of the the latest RC-TriTec Gd2O2S:Tb neutron or x-ray scintilltors. Standard OG2 x-ray and 400µ neutron scintillators are supplied and can be easily interchanged.
Any C- or F-mount detector can be used with the appropriate adapter, or even an ordinary Nikon consumer camera. This image was obtained in 3s on the ILL NeXT D50 beamline from our twin Nikkor 50mm 1:1 camera using a 10µ thick RC-TriTec Gd2O2S:Tb(LiF) scintillator with 6% of the light output of their 200µ scintillator. The inner circle shows that at least 25µ resolution was obtained.
To control this camera you need special software (included).
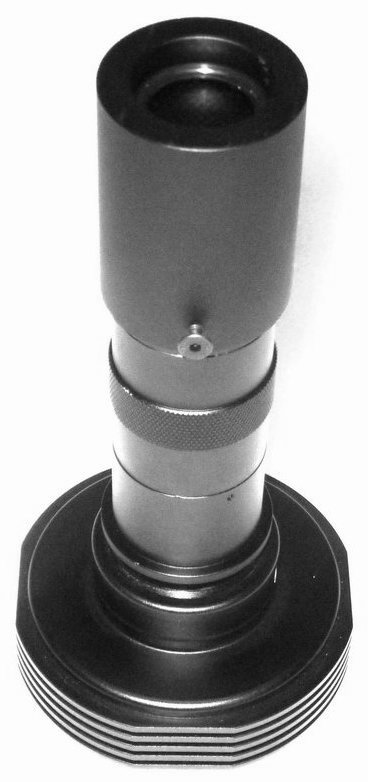
The old slim USB CCD requires no control box or power
 Our modern
slim USB CCD uses 10m amplified USB cables (supplied with the camera) for power as well as 16-bit image collection and exposure control. You need a computer to display real-time images, not a TV monitor, but the slim USB CCD has much higher grey-scale resolution as well as being a little more efficient. It has the same spatial resolution and costs the same as the video CCD.
Our modern
slim USB CCD uses 10m amplified USB cables (supplied with the camera) for power as well as 16-bit image collection and exposure control. You need a computer to display real-time images, not a TV monitor, but the slim USB CCD has much higher grey-scale resolution as well as being a little more efficient. It has the same spatial resolution and costs the same as the video CCD.
All components of the slim USB camera can be easily replaced.
To control this camera and display the image on a PC, you need special software (included with the camera).
The old high resolution CCD is for long exposures
The high resolution cooled CCD provides a choice of high resolution with a low noise CCD.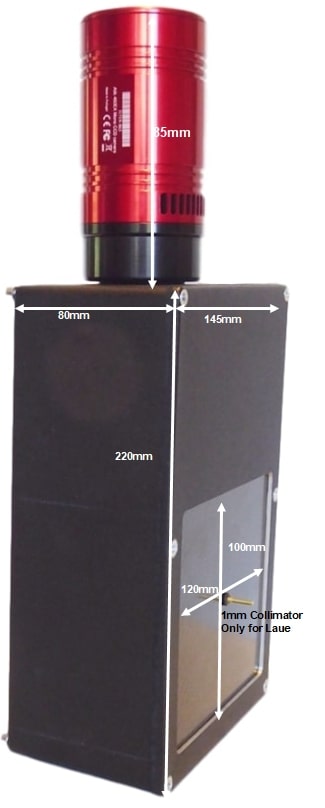
- Sensor Type: Sony ICX825ALA or ICX694ALG
- Image size: Diagonal 11mm (Type 2/3") or 16mm (type 1")
- Resolution: 1392x1040 or 2759 x 2200
- Pixel Size: 6.45x6.45 µM or 4.54 x 4.54 µM
- Binning: from 2x2 to 8x8 (improved intensity & read-out )
- High sensitivity: (QE>75% at 500-600nm), low smear
- Low dark current: 0.003@-10 °C, excellent anti-blooming
- Full well capacity: 20,000 or 40,000 electrons
- ADC: 16 bit grey scale, optional filtering & distortion
- Readout Noise: 4 e- typical (slower readout = less noise)
- Readout Time: 1-3s
- Interface: USB 2.0 High Speed with 10-20m USB cables
- Power: 12v DC 0.8A, to EU, UK, US/Japan, AU/CN
- Maximum Exposure Length: Unlimited
- Minimum Exposure Length: 1/1000s (1s at full resolution)
- Cooling: Thermoelectric set point with max ΔT=-27°C
- Lens Coupling: T2-mount, C-mount, F-mount, micro 4/3
- SDK: C++, VB Wrapper, .net Wrapper, ImageJ, LabView
All components of the high resolution camera can be easily replaced.
To control this camera and display the image on a PC, you need
special software
![]()
The old 1-CCD Laue x-ray or neutron camera
The NeutronOptics 1-CCD Laue Camera is usually preferred to the older 2-CCD camera, since it is less expensive, simpler to operate, and usually faster, since it uses a larger CCD to image a smaller, but still sufficient area of 120x100mm.
This
Si backscattered Laue pattern was obtained by Dr Dean Hudek at Brown University, and a
Sm2Fe17 pattern was obtained by Dr Léopold Diop and Prof W. Donner at the Technische Universität Darmstadt in only 2 minutes on a 1960'6 Philips x-ray generator with a spot size of ~1mm and power of 30-50 kV and 30-50 mA.
To control this camera, you need special software (included).
![]()
The Old Macro x-ray or neutron camera
 Our old macro camera provided magnified images of small objects, with a resolution limited only by the resolution of the scintillator. It is supplied with standard x-ray and neutron scintillators that can be interchanged easily; high resolution scintillators must be obtained separately.
Our old Macro camera was supplied with the
cooled Mammut CCD (shown), and special software must be used with that camera. Those instructions also describe how to set up the camera, even if your camera uses instead the slim CCD or the hi-res CCD.
![]()
The old video CCD can be used with a simple monitor
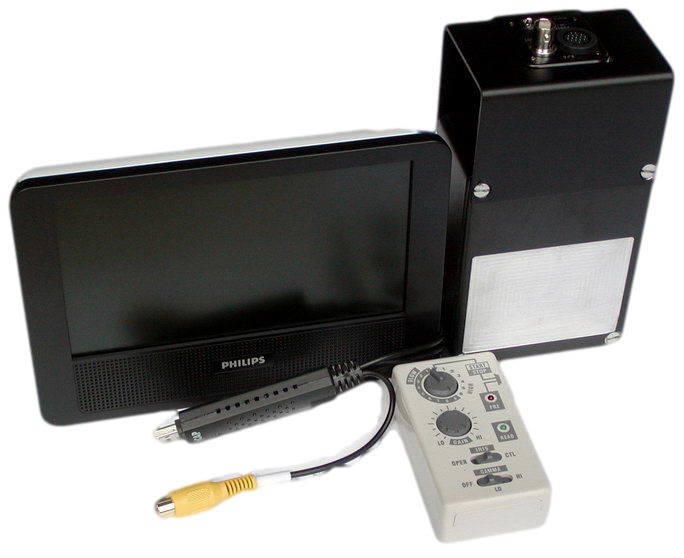 This is our original neutron camera, and is still available. The advantage of the
Watec video CCD is that you can display the image in real time on a simple TV monitor over an extension cable or eventually a wireless-video transmitter. The camera integrates the image over the set exposure time, but outputs a real-time video signal. The exposure is controlled by a small box via a 3-metre 16-wire cable.
To record and analyse the image on a PC, a video frame grabber is needed (included with the camera).
Please the the NeutronOptics Video Camera Manual.
This is our original neutron camera, and is still available. The advantage of the
Watec video CCD is that you can display the image in real time on a simple TV monitor over an extension cable or eventually a wireless-video transmitter. The camera integrates the image over the set exposure time, but outputs a real-time video signal. The exposure is controlled by a small box via a 3-metre 16-wire cable.
To record and analyse the image on a PC, a video frame grabber is needed (included with the camera).
Please the the NeutronOptics Video Camera Manual.
The prototype EMCCD neutron camera
 We developed a prototype Electron-Multiplying CCD (EMCCD) neutron camera using the Andor Luca EMCCD unit, and developed software for neutron imaging with it. We include it here for completeness, though we no longer market this camera.