If you have the Laue camera, you need these instructions instead.
If you have a standard video camera, you need these instructions instead.
If you have the High Resolution CCD, you need these instructions instead.
These instructions are for Windows-7; for other versions they may be slightly different.
For Win-8 you must
disable Driver Signature Enforcement since the driver is unsigned.
These instructions are for the cooled Mammut CCD option without the 90oprism.
With the uncooled Lodestar CCD, add the two 5mm spacers if you don't use the prism.
Then install the slim lodestar CCD software using the PHD application instead of NWS.
Finally, adjust the Magnification and Focus as described below.
Unpack and Assemble the Macro X-ray Camera
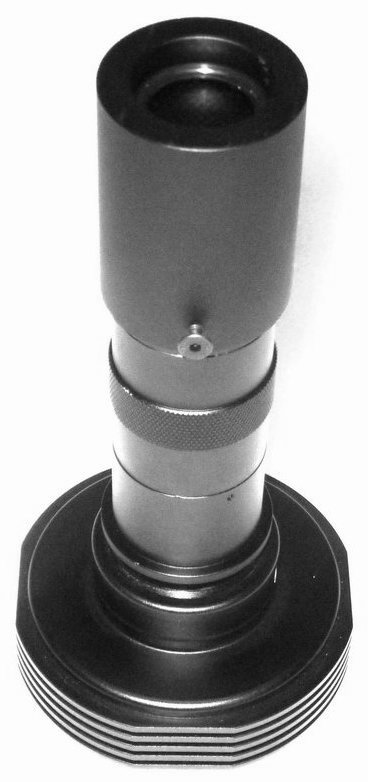
- Remove the cover from the CCD unit and screw on the macro lens.
- Don't use the prism mirror yet: use the lead glass protection.
- Remove the first rubber O-ring and scintillator disks from the lens.
- The second rubber O-ring holds a 0.5mm grid for focusing with light.
- Replace the grid with a scintillator and window for use with x-rays.
- There are 3 grades of x-ray scintillator, depending on resolution.
- Very high resolution YAG:Ce scintillator can be purchased separately.
- A (fragile) yellow neutron scintillator may also be supplied.
- Do NOT plug the camera into your computer yet.
Install the camera driver and NWS control software
- Run "global setup.exe" for NWS from the software CD or download it.
- The setup first checks for necessary software prerequisites:
- MicroSoft NET Framework
- ASCOM 5.0b at least (ASCOM is an astronomy software standard.)
- ASCOM 5.5 update
- When these components are installed the buttons will be dimmed.
- Otherwise, click each button in turn. Be patient.
- Click each button only once. If "helper.dll" is not found it can be skipped.
- When all 3 pre-requisite buttons are dimmed, only then click "Next".
- If Windows complains that it can't verify the software; choose "install anyway".
- Win-8 complains about unknown software; click "More info" then "install anyway".
- Wait for "Windows Camera Driver successfully installed", then click "Next".
- Install both the following items by clicking each, waiting and allowing changes:
- Lyuba ASCOM driver.
- Night Watch Studio (NWS) to control the camera and display images.
- Launch NWS and click "Next" to finish the setup.
- Finally connect the camera to your computer with the USB cable.
- Choose to automatically search for and install its driver. Be patient.
- You may have to repeat this if later you use a different USB port.
- To use the USB extension, plug it in separately & wait for it to be recognised.
- You do NOT need the 12V power supply until you want to use cooling.
- The center of the image doesn't correspond to the centre of the window
because the CCD chip is not centred to better than 0.5mm in its housing
Using NWS software to control the Macro Camera
Note: If you have the slim loadstar CCD use the PHD application instead of NWS.NWS contains several control and display windows that can be detached from the main interface by double-clicking their headers; they can be re-attached in the same way.
The two main control panels
are called "Capture" and "Camera Control". Click those tabs to switch between them.

Under "Camera Control" click "Connect" to connect to the camera, assuming it is physically connected by the USB cable. If you cannot connect, exit NWS, check your driver installation and USB cable, restart NWS and "Connect".
Don't use the "Cooler On" yet.
And don't change the camera "Offset" and "Gain". These values will be correct for the camera.
Click the images to enlarge them in JPEG.
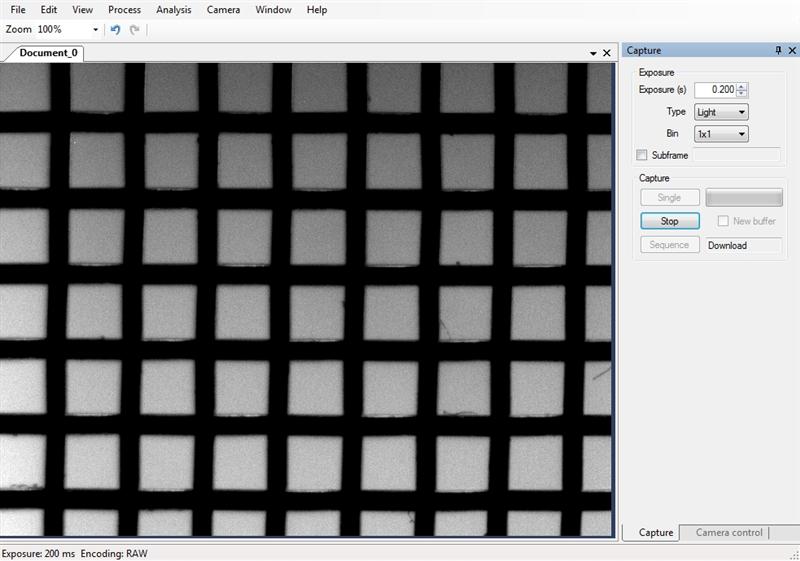 Switch to "Capture", and click "Loop". This will loop exposure, download and display until
you "Stop". You must "Stop" and restart "Loop" to reset the exposure time, or to change the binning
(2x2 will download faster and give x4 the intensity). You can set "Fast Readout" under "Camera Control".
You can also speed up readout by selecting "Subframe" and dragging the mouse around a region of interest.
Fast readout is useful when you are focusing.
Switch to "Capture", and click "Loop". This will loop exposure, download and display until
you "Stop". You must "Stop" and restart "Loop" to reset the exposure time, or to change the binning
(2x2 will download faster and give x4 the intensity). You can set "Fast Readout" under "Camera Control".
You can also speed up readout by selecting "Subframe" and dragging the mouse around a region of interest.
Fast readout is useful when you are focusing.
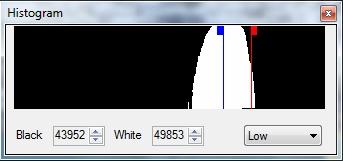 Note the third control tab called "Histogram". You can choose the display contrast to be "Low",
"Medium" etc or drag the blue and red markers over the histogram to display a particular range of intensities.
Note the third control tab called "Histogram". You can choose the display contrast to be "Low",
"Medium" etc or drag the blue and red markers over the histogram to display a particular range of intensities.
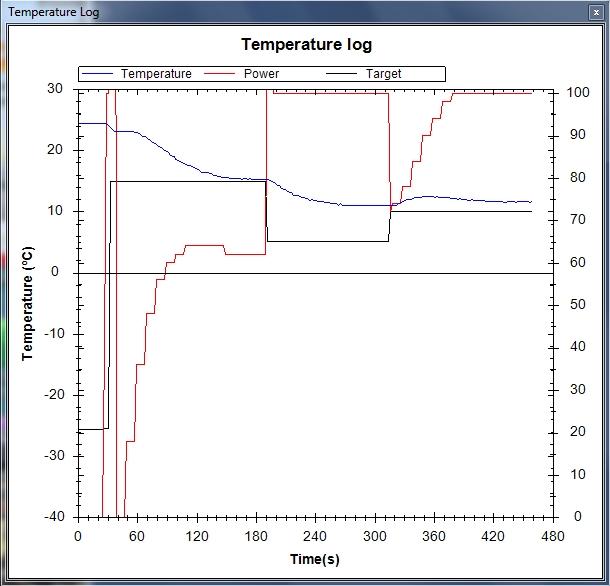 Finally you can try cooling to reduce noise (white pixels) for long exposures (>10s). Plug in the 12V
power supply. The fan will start; it is magnetically levitated to avoid vibration.
Under "Camera Control", click "Cooler On", enter a target temperature and click "Set". You can only
cool ~20C below the ambient "CCD temperature". Cooling below zero may fog the
CCD window (although there is a dessicant under the aluminium screw on the CCD chamber).
Finally you can try cooling to reduce noise (white pixels) for long exposures (>10s). Plug in the 12V
power supply. The fan will start; it is magnetically levitated to avoid vibration.
Under "Camera Control", click "Cooler On", enter a target temperature and click "Set". You can only
cool ~20C below the ambient "CCD temperature". Cooling below zero may fog the
CCD window (although there is a dessicant under the aluminium screw on the CCD chamber).
Under the "Camera" main menu, select "Temperature Log". This will show a plot of the CCD temperature with time, the cooling power, and the set temperature.
Double-click the display header to detach it and then resize it.
Note that cooling may be disabled while the camera is in "Loop" mode!
![]()
Magnification and Focus
Clamp the scintillator chamber to the non-rotating end of the macro-lens with the camera in the straight-through configuration without the 90-degree prism (but with two 5mm spacers if you have the lodestar CCD). There is only one zoom control ring on the lens for adjusting magnification and focus. Small changes in the focal distance are made by sliding the scintillator chamber on the lens, but usually you won't need to do that once the camera is set up. Additional CCD-lens spacers can eventually be used to adjust magnification.
 With the 0.5mm grid in place, and in "Loop" mode, turn the zoom ring completely anti-clockwise (looking down the lens from the camera,
assuming it is in line with the lens with the lead glass protection in place).
You should see a Field-Of-View (FOV) of ~4x3mm. Adjust the zoom ring and eventually the focal slider
until you obtain a sharp image.
With the 0.5mm grid in place, and in "Loop" mode, turn the zoom ring completely anti-clockwise (looking down the lens from the camera,
assuming it is in line with the lens with the lead glass protection in place).
You should see a Field-Of-View (FOV) of ~4x3mm. Adjust the zoom ring and eventually the focal slider
until you obtain a sharp image.
Note that the the raw FITS images have been converted to JPEG with reduced resolution for WWW illustrative purposes.
Click the images to enlarge them in JPEG.
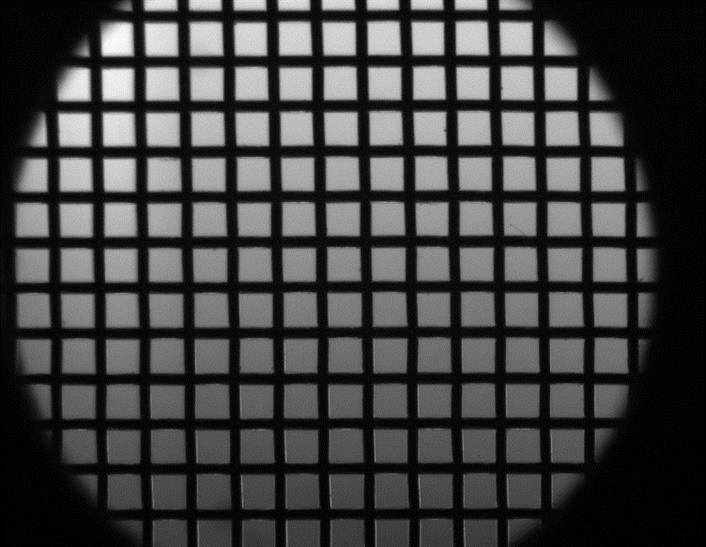 Now turn the zoom ring 360o clockwise, and then back in small steps.
The blurred image will become focused again
with a FOV of ~8x6mm, WITHOUT changing the focal slider.
You can obtain x2 magnification using only the zoom ring.
The circle is the 8mm high resolution scintillator holder.
Now turn the zoom ring 360o clockwise, and then back in small steps.
The blurred image will become focused again
with a FOV of ~8x6mm, WITHOUT changing the focal slider.
You can obtain x2 magnification using only the zoom ring.
The circle is the 8mm high resolution scintillator holder.
You can obtain greater magnification by increasing the distance between the CCD and the lens,
using C-mount spacers or the mirror prism, while reducing the scintillator-lens distance using the slider.
Using the 90o Prism Option
The 42mm T2-male lens adapter screws into one side of the mirror prism, and the T2-female CCD-unit into the other side via the 5mm rotation coupler, which can be used to orient the CCD-unit. With the zoom ring completely anti-clockwise, reduce the scintillator-lens slider distance until focus is achieved with a FOV of ~3x2mm. Fully reduce the slider distance and turn the zoom-ring about 90o clockwise to obtain the maximum FOV of ~4x3mm with the mirror-prism.Advice on Resolution, Magnification and Intensity
Ultimately, the x-ray resolution will be determined by the thickness of the scintillator. You will probably not want to increase magnification further because of this limitation, and because higher magnification and thinner scintillators mean less intensity.Remember that a radiograph is just a shadow of the object. Unless you have a "point" source and the object close to the scintillator screen, this shadow may not be sharp.
You can however, further magnify the image by moving the object away from the screen, toward a fine-focus x-ray source.
ImageJ for ASCOM: Control the Camera with ImageJ
ImageJ is recommended for more complex image analysis. ImageJ will open the 16-bit raw FITS files produced by NWS, modify contrast, filter out noise, change other properties, and save the images in various formats. More importantly, it will allow you to measure intensity profiles and display your data in ways that will make it more meaningful.
If you install the Lyuba ASCOM camera driver, you can control the camera directly using
ImageJ for ASCOM. This has advantages in that the acquired images are
opened directly in ImageJ, and you can easily modify the interface by extending the ImageJ scripts.
Check that C:\Program Files\Common Files\ASCOM\Camera\ASCOM.LyubaDriver.dll is
dated on or after 18/7/2012.
![]()