If you have the slim USB CCD, you need these instructions instead.
If you have the FLIR CMOS camera, you need these instructions instead.
If you have the High Resolution CCD, you need these instructions instead.
If you have the Macro x-ray camera, you need these instructions instead.
If you have the 1CCD-Laue camera, you need these instructions instead.
If you have the 2CCD-Laue camera, you need these instructions instead.
If you have a standard NeutronOptics camera, you need these instructions instead.
Install the Andor Software Development Kit
The Andor Software Development Kit (SDK) is the only software to be purchased with the Andor Camera. Allow the CD to auto-run or else open the "drivers" folder and double click "setup.exe". When setup has finished, shut down, connect the power cable to the Andor camera and use the USB-2 printer-type cable to connect it to your computer, which should then be restarted. New software will be found, so allow Windows to install it automatically. You won't be able to use the camera until you install Micro-Manager.Install Micro-Manager
Download and run the latest Micro-Manager installer MM_Setup_1_2_xx.exe. Versions later than 1.2 give errors with the older Andor driver. Ignore the Windows warning that the publisher is unknown. This will also install a compatible version of ImageJ ; you usually don't want to install that separately. You need not run Micro-Manager until you have installed the Andor configuration file.Install the Andor Micro-Manager Configuration file
Copy the file MMConfig_andor.cfg to your Micro-Manager folder, normally C:\Program Files\Micro-Manager1.2 and finally with the camera powered up you can launch Micro-Manager. Eventually, you can personalise setup by editing this text file. Further information can be found on the Andor Micro-Manager page.Running Micro-Manager for Andor with ImageJ
When you launch Micro-Manager, ImageJ will also be launched. You will be prompted for the configuration file MMConfig_andor.cfg. If error messages about "Ixon" occur, it is because you haven't installed the Andor SDK drivers or the camera is not powered up and connected. When it is, click on the "Live" button in the interface (below).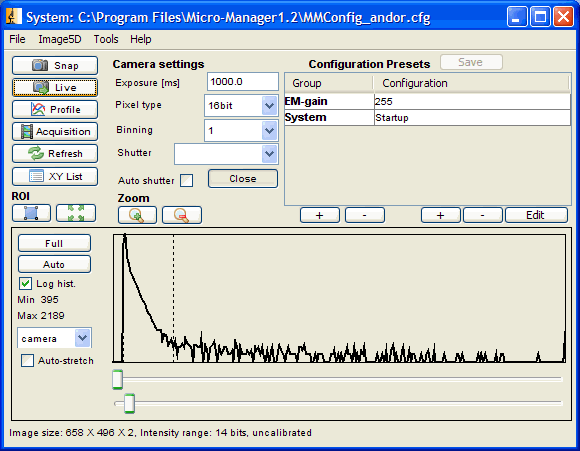
You should see an image from the camera as below, showing only noisy pixels in the absence of neutrons, because
you have an Exposure of 1000 msec with the maximum EM-gain of 255 as selected by default in the interface.
Click on these values to change them. Note that the "Log hist." option has been checked in the interface to
stretch the range of intensities, and the slider controls below the intensity plot above have been adjusted to
select only peak counts (noise). Try changing the Exposure and EM-gain controls and the sliders, and explore
the difference between "Live" and "Snap". Open the "Tools/Device/Property Browser" to list camera parameters and
edit MMConfig_andor.cfg
![]()
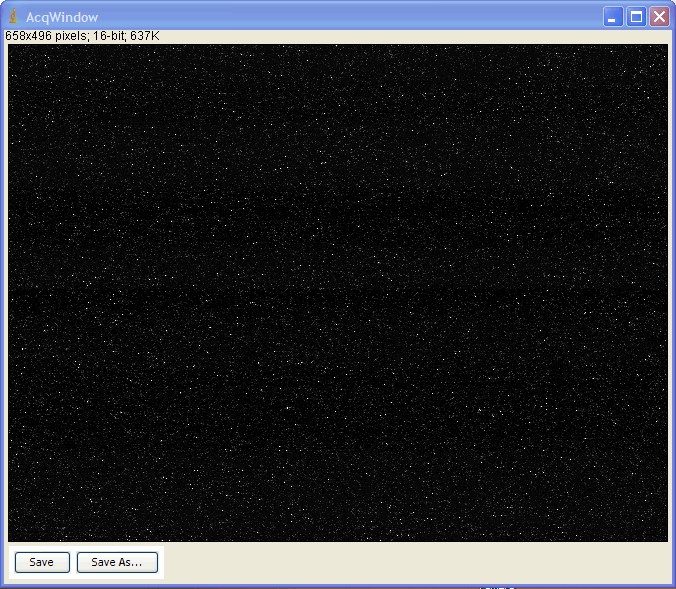
Now you can explore the ImageJ interface (below). For example, take a "Snap", select Image/Type/8-bit and select
Process/Noise/Despeckle. The noisy pixels are removed.
Now you are ready to try your camera with neutrons. Remember
to adjust the exposure and EM-gain to obtain the best compromise between neutron intensity/contrast and noise level,
adjusting the intensity sliders as required.

ImageJ is a very powerful image treatment application and we can only indicate some of
its many possibilities,
including capture with multiple cameras and image integration.
![]()